

Introduction
Today we will install the very popular Git server solution with issue tracker and Wiki – GitLab.
What we need for the installation:
- GitLab must be used by small team of developers ( up to 10 team-members).
- GitLab must be secured with SSL certificate.
- Data that we will save not on a virtual disk of the virtual machine, but inside S3 storage which will be mounted inside operational system.
First of all we need to check what are the system requirments for GitLab: https://docs.gitlab.com/ce/install/requirements.html.
In this configuration with 10 team-members a VM with these configurations below should be suitable:
- OS: CentOS7.
- CPU: 1
- RAM: 8 Gb
- SSD: 20 Gb
Step 1: Pre-configuration of the Virtual Machine
When we are connecting to the Virtual Machine for the first time, best practice – change SSH standart port from standart port 22 to another random port number + in clear PILW.IO virtual machine is by default disabled firewall.
In your first login into VM, update all installed packages in OS by using command:
sudo yum update -yWhen all packages are updated we can start to configure the new port for SSH. In this user guide we will use port 2019 for SSH conection.
Open SSH configuration file by using command:
sudo vi /etc/ssh/sshd_configAfter that, we need to find commented record #Port 22, and change it into uncommented record Port 2019 and save this configuration file.
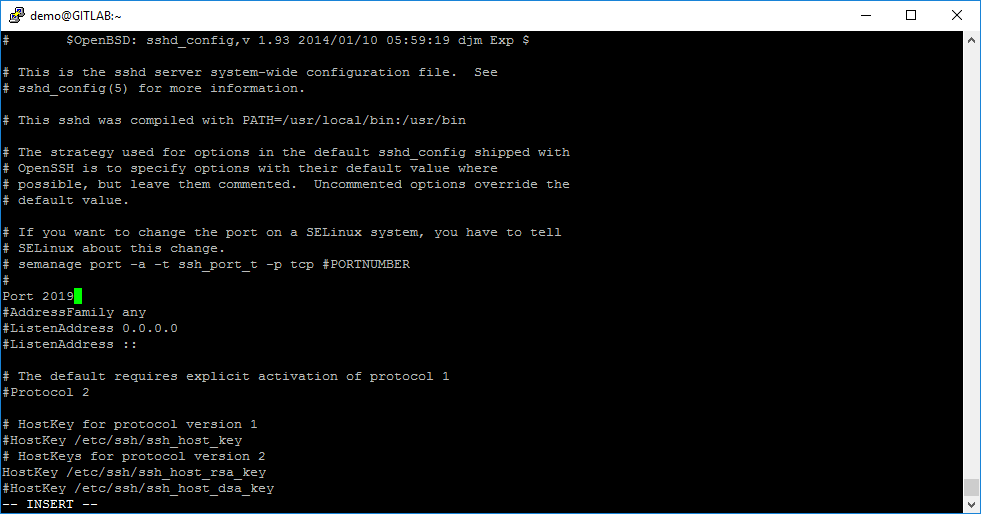
Now we need to enable this port using in SELinux. For this action, we will use the tool with name semanage. Use the command:
sudo semanage port -a -t ssh_port_t -p tcp 2019For new SSH configuration to apply, we need to restart the SSH service:
sudo service sshd restartWhen SSH port is changed, we need to install a firewall and configure it. For firewall in Linux, in this article we prefered using iptables service.
To install iptables we need to use command:
sudo yum install iptables-services -yAfter package installation we need to start the service with this command:
sudo service iptables startBy default service ssh is enabled, but by default iptables using for this port 22. Save the current iptables config to file:
sudo iptables-saveWe need to change enabled TCP port 22 to TCP port 2019 in rules. To make it easier, open iptables config file with command:
sudo vi /etc/sysconfig/iptablesAnd change the port from 22 to 2019 in rule:
-A INPUT -p tcp -m state --state NEW -m tcp --dport 22 -j ACCEPT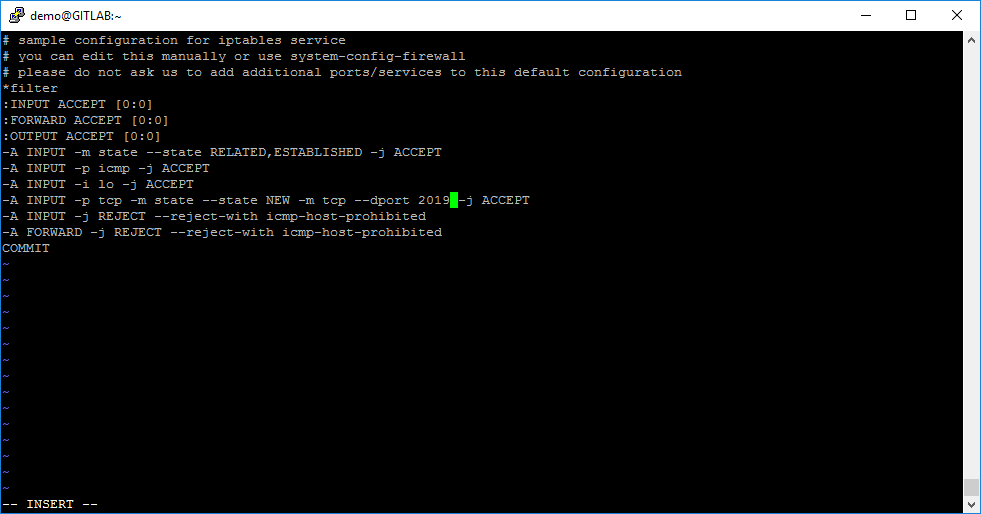
When port is changed in iptables config file, you need to restart the iptables service:
sudo service iptables restartMake sure that iptables service will be starting after each reboot. For this, use the command:
sudo systemctl enable iptablesNow everything is ready to go! Just to double check things, reboot your VM and check if the rules are working perfectly. For this action use command:
sudo reboot nowAfter this step, our SSH session will be lost. Waite couple of minutes and try to re-connect to your VM with the new SSH port – 2019.
Step 2: Installation of GitLab
Now we can start the deployment of GitLab.
As our first step, we will enable TCP web port 80 for GitLab in iptables. Open iptables config file, by command:
sudo vi /etc/sysconfig/iptablesAnd add this rule:
-A INPUT -p tcp -m state --state NEW -m tcp --dport 80 -j ACCEPT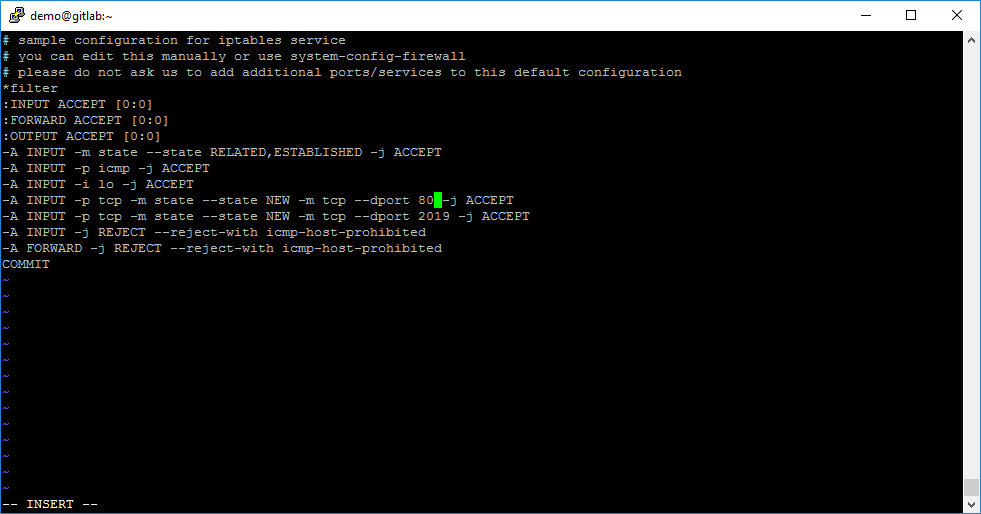
When TCP port 80 is enabled in iptables config file, you need to restart the iptables service:
sudo service iptables restartAfter this we can add the official GitLab Community Edition repository into our OS by the commands:
sudo curl https://packages.gitlab.com/install/repositories/gitlab/gitlab-ce/script.rpm.sh | sudo bashNow we can start the installation of GitLab. In this user guide, GitLab will be available by DNS name gitlab-demo.hooldus.it, so we will be using this command:
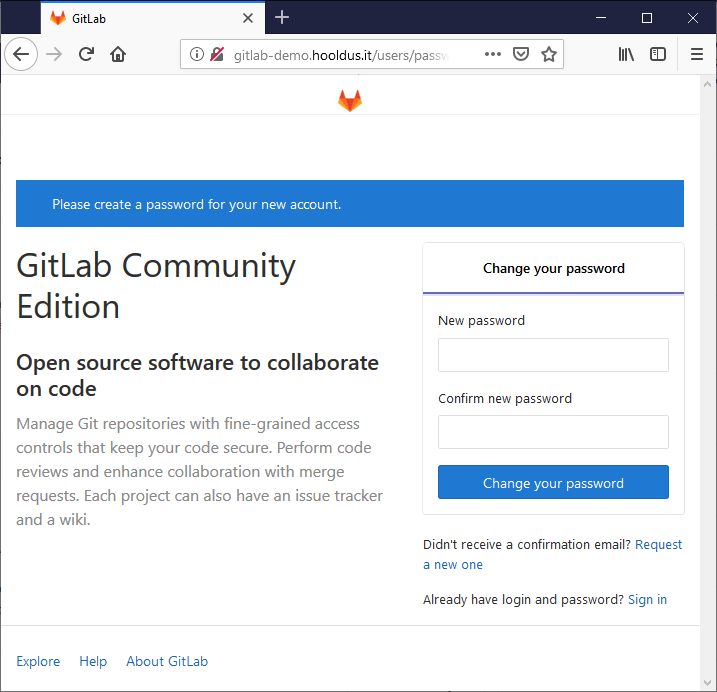
sudo EXTERNAL_URL="http://gitlab-demo.hooldus.it" yum install -y gitlab-ceWhen GitLab installation is finished, open it in your browser URL that you wrote before the package installation (in our case it is http://gitlab-demo.hooldus.it/) and setup GitLab “root” password.
Step 3: Configuration of SSL in GitLab
GitLab is now installed, but currently it is using not a secured web protocol HTTP. We need to configure SSL secured connection HTTPS. For us we will be using free Let’s Encrypt SSL certificate.
First, we need to enable TCP web port 443 for GitLab in iptables. To do that easily, open iptables config file with command:
sudo vi /etc/sysconfig/iptablesAnd add this rule:
-A INPUT -p tcp -m state --state NEW -m tcp --dport 443 -j ACCEPT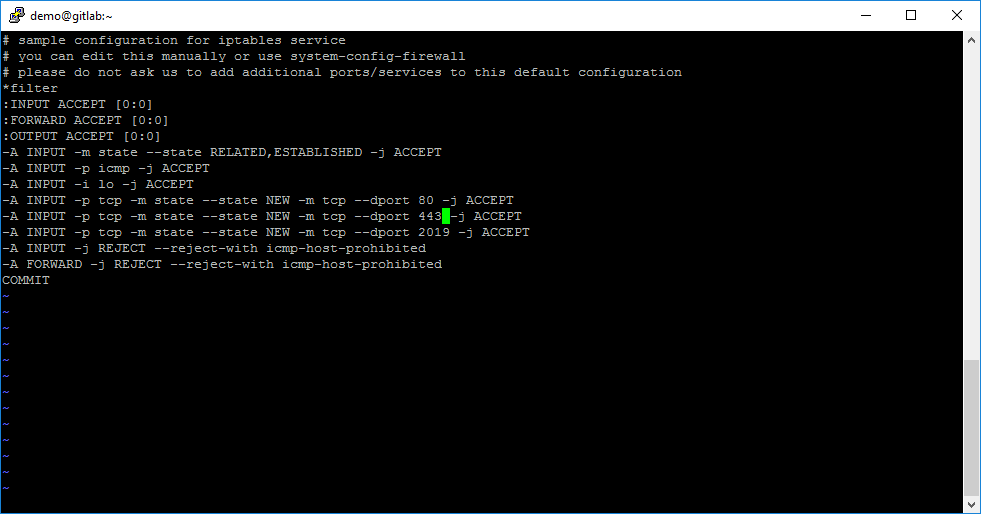
When TCP port 443 is enabled in iptables config file, you need to restart the iptables service:
sudo service iptables restartWhen iptables service is restarted, we need to install a package named “certbot” that can help us to generate Let’s Encrypt SSL Certificate easier. To do that, we need to use two commands:
sudo yum install -y epel-release
sudo yum install -y certbot
When package certbot is installed, create the directory where you will store Let’s Encrypt certificated by using command:
sudo mkdir -p /etc/gitlab/ssl/When directory is created, we need make changes in the GitLab configuration file and setup a directory for Let’s Encript validation:
Open file /etc/gitlab/gitlab.rb:
sudo vi /etc/gitlab/gitlab.rbAfter this action find string inside the configuration file:
# web_server['home'] = '/var/opt/gitlab/nginx'When the configuration string is found, write the additional configuration string:
nginx['custom_gitlab_server_config'] = "location ^~ /.well-known { root /etc/gitlab/ssl; }"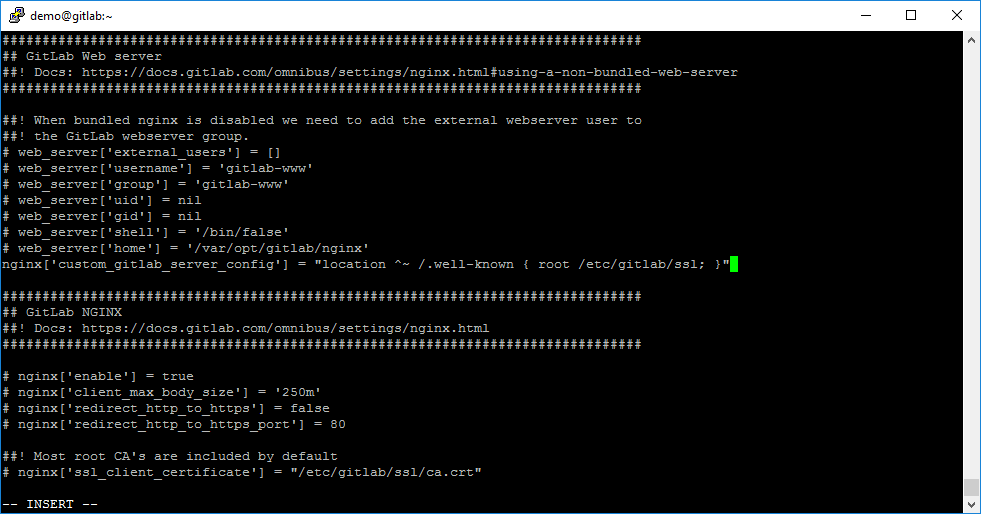
Rebuild GitLab configuration by using command:
sudo gitlab-ctl reconfigureWhen GitLab configuration is rebuilt, generate the Let’s Encrypt certificate by this command:
sudo certbot certonly --webroot --webroot-path=/etc/gitlab/ssl/ -d gitlab-demo.hooldus.it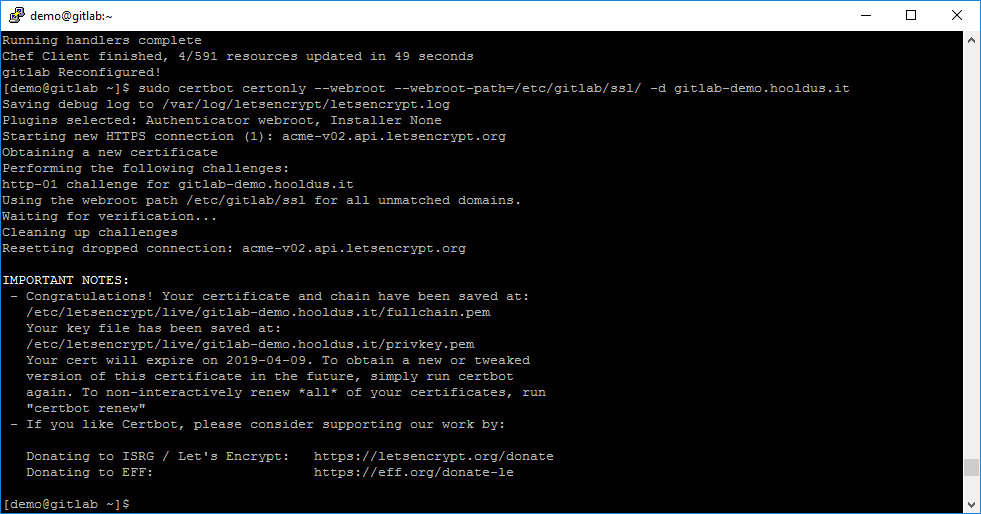
Now we can see the SSL certificate was generated and we see locations of *.pem files. So we can start to configure a secured HTTPS connection for GitLab.
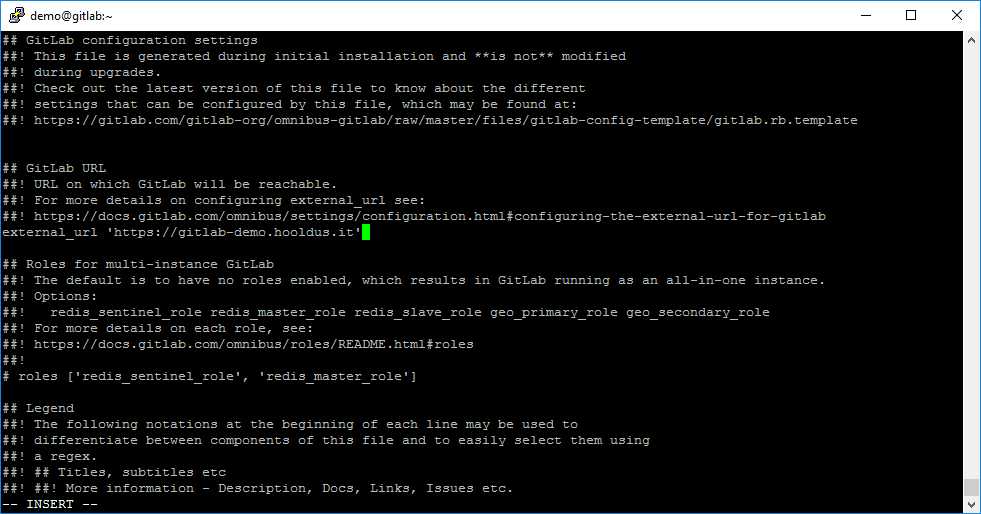
Open file /etc/gitlab/gitlab.rb:
sudo vi /etc/gitlab/gitlab.rbFind string:
external_url 'http://gitlab-demo.hooldus.it'and change protocol http to https
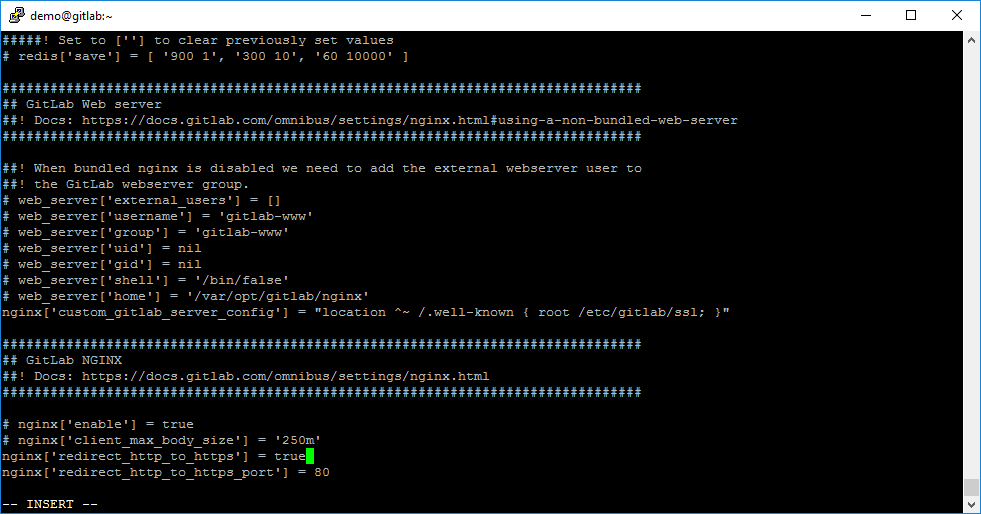
After this, you need to uncomment rule nginx[‘redirect_http_to_https’] and set value true for forcing users to redirect to HTTPS protocol, if they open GitLab web-service over HTTP protocol.
And as our last step – uncomment configuration rules nginx[‘ssl_certificate’] with nginx[‘ssl_certificate_key’] and write the correct paths of Let’s Encrypt SSL files. In our case it is:
nginx['ssl_certificate'] = "/etc/letsencrypt/live/gitlab-demo.hooldus.it/fullchain.pem"
nginx['ssl_certificate_key'] = "/etc/letsencrypt/live/gitlab-demo.hooldus.it/privkey.pem"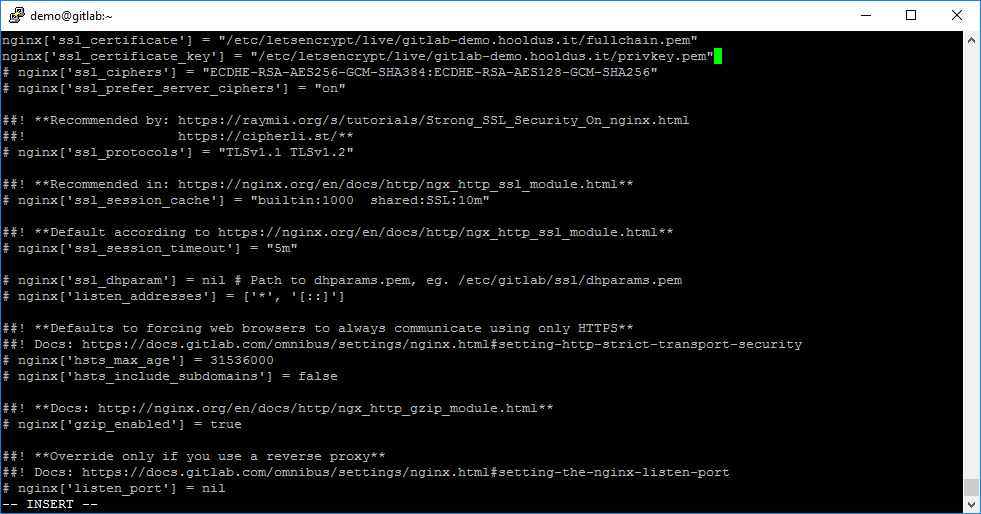
When configuration file changes finished and saved – you need to rebuild GitLab configuration by using command:
sudo gitlab-ctl reconfigure
Let’s Encrypt certificate is valid only 90 days. We may need to configure autorenewal every 30 days. For this we need add one record into CronTab:
Use command:
sudo crontab -eAnd add record:
0 1 1 * * /usr/bin/certbot renew --quiet --renew-hook "/usr/bin/gitlab-ctl restart nginx"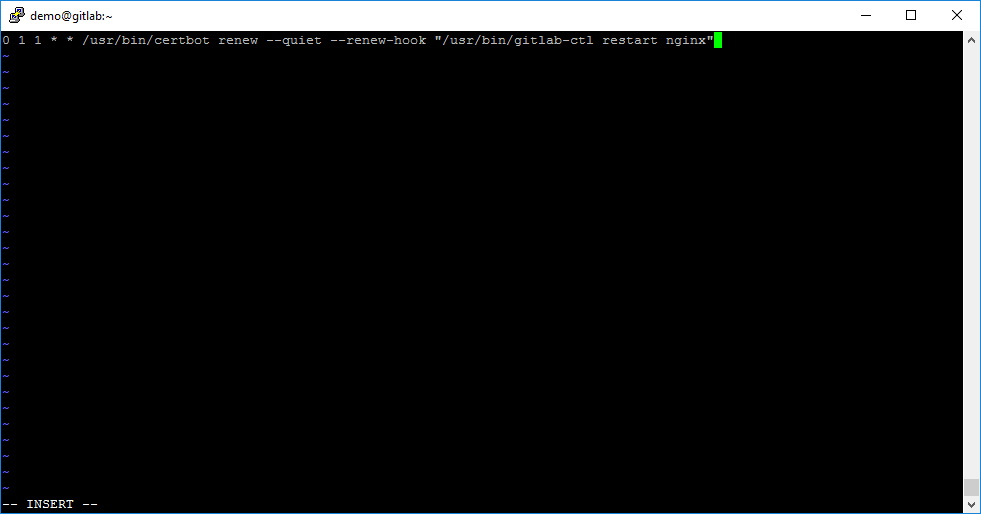
Congratulation! Secured SSL connection is configured with SSL certificate autorenewal.
Step 4: Configuration of S3 storage file system for GitLab repositories
For GitLab repositories we will use the low cost S3 storage instead of the usual VM storage.
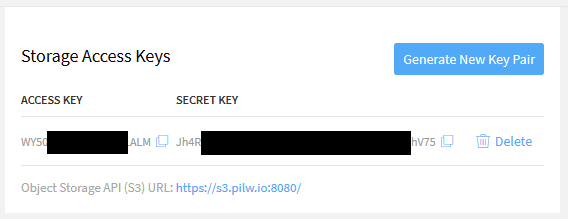
First, we created an S3 storage in PILW.IO.
For mounting S3 storage inside our VM, we will use the tool s3fs-fuse. To install, use command:
sudo yum install -y s3fs-fuseWhen the s3fs-fuse package is installed, you need to create a file where it will save the access and secret keys from S3 the storage. For file creation use command:
sudo vi /etc/gitlab/s3fs-passwdAnd inside the file, insert your access and secret keys that separated with colon mark.
For security reasons, you need to set up 600 rights for the file with saved keys from S3 storage. For this action use command:
sudo chmod 600 /etc/gitlab/s3fs-passwdNext step – create directory for S3 storage mounting. To do that, use command:
sudo mkdir /mnt/s3gitlabYou can try to mount S3 storage inside the directory /mnt/s3gitlab by using command:
sudo s3fs s3gitlab /mnt/s3gitlab -o passwd_file=/etc/gitlab/s3fs-passwd -o url=https://s3.pilw.io:8080/ -o use_path_request_style -o dbglevel=infoBut this mount will be lost after the VM restart. For automount, you need to do the following actions:
Open fstab configuration file:
sudo vi /etc/fstabAnd add new string with this parameters:
s3fs#s3gitlab /mnt/s3gitlab fuse _netdev,allow_other,use_path_request_style,url=https://s3.pilw.io:8080 0 0
Now we have to make changes in the default directory of repositories in GitLab configuration file:
Open file/etc/gitlab/gitlab.rb:
sudo vi /etc/gitlab/gitlab.rbUncomment section git_data_dirs and set this values:
git_data_dirs({
  "default" => {
    "path" => "/mnt/s3gitlab"
   }
})
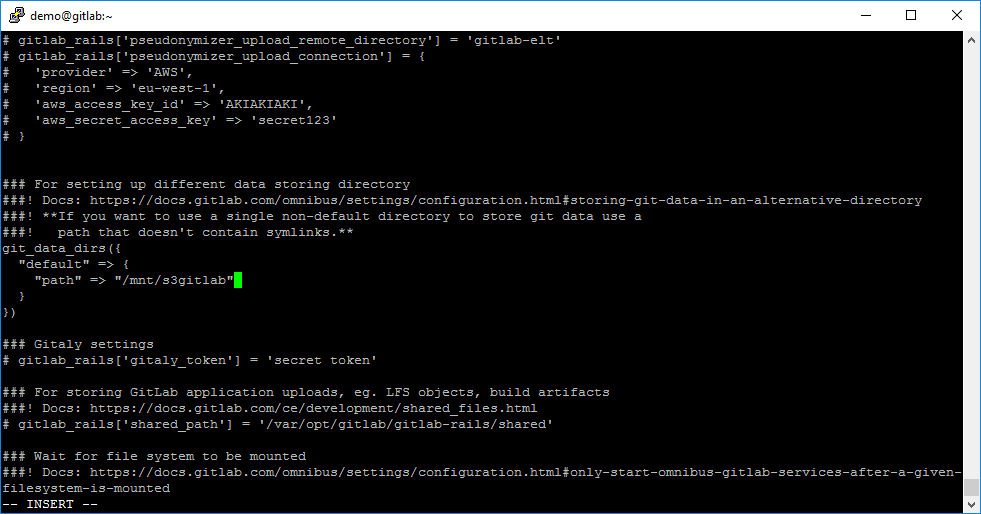
Rebuild GitLab configuration by using command:
sudo gitlab-ctl reconfigureMission accomplished! Now GitLab is configured with SSL and PILW.IO S3 storage.


0 Comments
Add Yours →